This post describes how to make a simple photobooth (for a wedding or other event) using a Raspberry Pi, a DSLR camera and some simple python scripts.
How to build a Raspberry Pi Photobooth
I got married earlier this year. As part of the ‘big day’ I wanted to have a photobooth to try and capture some images of our guests away from the glare of the Official Wedding Photographer© and from the constant selfies of smartphones.
Hiring a photobooth is a) expensive, b) sure to give you the same “wedding photobooth photos” as everyone else, and c) no fun. So I decided to make one myself instead :)
The Basic Idea
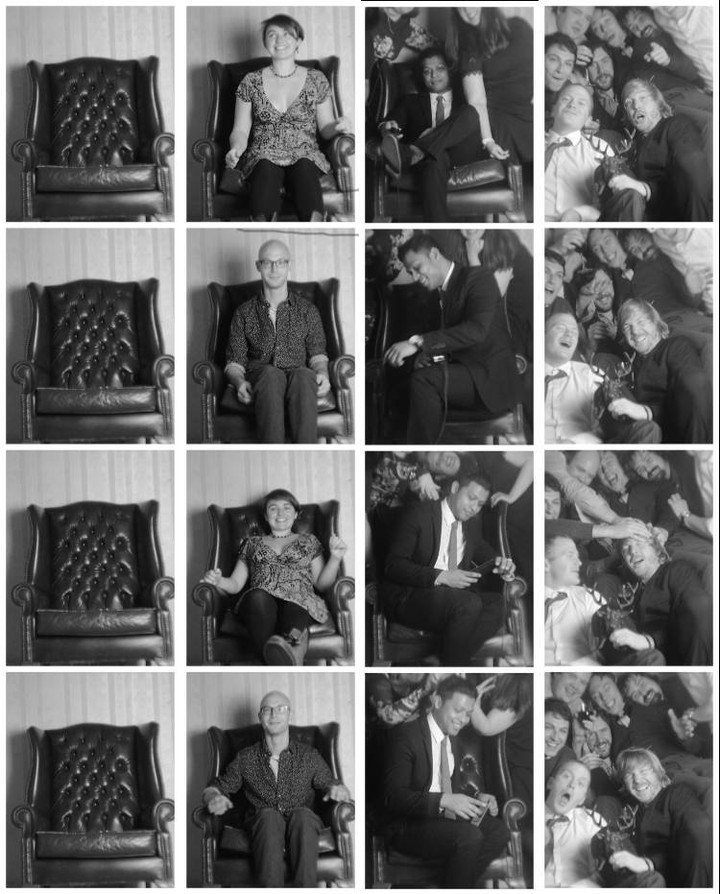
The guests would sit in an armchair and press a button. The photobooth would then take four photos and arrange them in a strip.
What you will need to build a photobooth
The bill of materials for the project included:
- Raspberry Pi Model B (not the latest one but I had one handy and it fit the break-out board below)
- Raspberry Pi GPIO break-out board
- Digital camera (I used my Nikon D7000)
- Lomography 55mm wide-angle lens
- A DSLR Lomo lens adaptor
- An old camera tripod
- Old, 1970s Betamax recorder remote control
- 8-pin DIN socket
- 6x 10mm super-bright, white LEDs
- Perfboard, wire, various resistors
- Cheap glass picture frame
- Coloured cellophane, tin foil, thick cardboard and some duct tape
- Some kind of case to put it all in (I used an old wine box I bought on eBay)
I wanted the photos to have a ‘vintage’ look without just ‘Insta-filtering’ them so I used a lo-fi lomography lens on my digital camera. This isn’t essential though and a ‘proper’ Nikon lens would produce sharper images.
You don’t have to use a Nikon D7000 either, you just need a digital camera that’s compatible with the gphoto2 library.
Setting up the Raspberry Pi
To set up the Pi so that it could fire the DSLR, I used the ‘Step 2’ section of this excellent guide from a similar project.
My photobooth was slightly simpler in that it didn’t have any way to instantly reproduce the shots once they had been taken. Similar projects can have a printer installed as part of the set-up. I wanted to keep this project as simple (and cheap) as possible though. Having no way of seeing what the photos looked like also had the effect of making people less self-conscious in front of the camera.
The python script
The logic-flow of the python script is simple:
- Use a ‘while True’ loop to wait for the user to press the button
- When a button press is detected, take four photos with the digital camera
- Crop and re-size the four images, convert them to grayscale and join them together in a classic “photobooth style”
The code is available in full on my github page.
The woodwork
This project involved more wood cutting than my usual projects. The case of the photoboth was a wine box that I pick up cheap on eBay. The camera was held in place by the top of an old camera tripod that I screwed to some 2”x4” that I had lying around. I used a circular drill bit to cut the holes for the camera lens as well as the holes for the indicator lights.
The lighting
I wanted the indicator lights to have the feel of a vintage pinball machine rather than look like modern LEDs. To get this I used the glass from a cheap picture frame (which luckily only just fit the inside of the box). This was fixed in place with some strong tape.
To get the ‘vintage pinball machine’ look I used some cellophane (for colour), greaseproof paper (to diffuse the light and give it a more ‘natural’ look) and some tin-foil shaped into a cup shape to isolate each LED. The LEDs were mounted onto some thick cardboard which was mounted to the case with some strong tape.
The remote
To trigger the script I used an old wired remote control from a 1970s betamax machine. The buttons in the remote were simple on/off contact switches so I shorted connected them directly to the 8-pin DIN output and removed any of the other components in the remote to prevent any stray connections. I picked up a cheap socket on eBay and drilled a hole in the side of the case to plug the remote into. For the python script, this page was useful in making the remote control control the Pi itself.
The breakout board
The breakout board was used to connect the remote and the LEDs to the GPIO pins on the Raspberry Pi. The pin numbers used are specified in the Reference.py file on my github site. You’ll need to update these if you use different GPIO pins on your project (there’s a handy pin map here). This guide was useful in understanding how to turn the LEDs on and off using the GPIO pins and Python.
Things I’d Do Differently
The photobooth was a great success and the photos from the photobooth are among my favourite from the day. There are a couple of things I’d do differently next time around:
Better black and white photos
The way that the script converts the images to grayscale was always designed to be ‘quick and dirty’. There are dozens of online tutorials on how to create good-looking black and white images from colour shots. The script would benefit from having a more sophisticated technique for converting the images to black-and-white.
Find some way to share the images
Also, while a printer would have been expensive (both to buy and supply with ink and paper) it could have been fun to auto-upload the photo strips to Flickr or some other photo-hosting site so that people could view and share them that way. The downside of this approach is that it would have encouraged people to look at their smartphones and facebook while they were at a party which can be pretty anti-social.